Jenkins for Beginners- Installation, Setup, and First CI/CD Pipeline
A few weeks ago, I began my journey into the world of DevOps, starting with the DevOps Mastery Specialization on Coursera by KodeKloud—an excellent starting point for anyone new to this space. In this blog, I’ll walk you through one of the core tools I’ve explored: Jenkins. We’ll cover how to install Jenkins, set it up, and create a simple pipeline to get a hands-on feel for continuous integration.
Jenkins
Jenkins is a self-contained, open-source automation server used to automate various tasks involved in building, testing, and deploying software. It plays a central role in enabling Continuous Integration (CI) and Continuous Delivery (CD). One of Jenkins’ biggest strengths is its extensive plugin ecosystem—thanks to the vast number of plugins available through its Update Center, Jenkins can integrate with nearly every tool in the CI/CD toolchain.
Another advantage of Jenkins is its ease of installation. Being a Java-based application, it runs out of the box on multiple platforms, including Windows, Linux, macOS, and other Unix-like systems.
Why Jenkins?
When starting a new project, setting up a manual CI/CD process often leads to challenges such as:
- Slower release cycles
- Manual and error-prone builds
- Inconsistent testing processes
- Lack of automation and repeatability
Jenkins helps overcome these issues by automating:
- Builds and tests
- Deployment pipelines
- The entire CI/CD lifecycle
Continuous Integration (CI) is the practice of automatically building and testing code every time a change is made.
Continuous Delivery (CD) takes it a step further by automating the release process, allowing for faster and more reliable deployments.
Content
- About
- Prerequisites
- Installation
- Accessing Jenkins
- Jenkins Components
- Jenkins Pipeline
- Conclusion
- References
Prerequisites
Getting started with Jenkins is simple—you only need basic command-line knowledge and access to a system where you can install and run it.
Jenkins is cross-platform and works on a wide range of operating systems, including Windows, Linux, macOS, FreeBSD, and other Unix-based systems.
For this blog, I’ll be using Ubuntu running on an AWS EC2 instance. If you’re following along on a similar setup, here are the minimum system requirements:
- 256 MB of RAM (though at least 4 GB is recommended for smoother performance)
- 1 GB of disk space (recommendation: 50 GB or more for real-world usage)
Installation
Setting Up the Environment (AWS EC2 with Ubuntu)
Begin by launching an AWS EC2 instance using an Ubuntu Server AMI. Most of the default settings can remain unchanged, but make sure to generate an RSA key pair to enable secure SSH access to the instance.
Once the instance is launched, connect to it using an SSH client. Before establishing the connection, it’s important to update the permissions of the private key file to restrict public access:
1
chmod 400 jenkins-test.pem
Then, connect to the EC2 instance using the following command (replace the public DNS with the one associated with the instance):
1
ssh -i "jenkins-test.pem" ubuntu@ec2-98-81-150-81.compute-1.amazonaws.com
With the server connection established, proceed to the Jenkins installation steps.
Installing Java and Jenkins on Ubuntu
Jenkins requires the Java Runtime Environment (JRE) to run. While it’s also possible to run Jenkins inside a Docker container, this guide focuses on a direct installation on the Ubuntu server.
To install the default JRE package:
1
sudo apt install default-jdk -y
Verify the installation by checking the Java version:
1
java -version
Once Java is confirmed to be installed, proceed with the Jenkins installation steps:
Download the Jenkins GPG key:
1
sudo wget -O /usr/share/keyrings/jenkins-keyring.asc https://pkg.jenkins.io/debian-stable/jenkins.io-2023.key
Add the Jenkins APT repository:
1
echo "deb [signed-by=/usr/share/keyrings/jenkins-keyring.asc] https://pkg.jenkins.io/debian-stable binary/" | sudo tee /etc/apt/sources.list.d/jenkins.list > /dev/null
Update the package index:
1
sudo apt-get update
Install Jenkins:
1
sudo apt-get install jenkins -y
Start and Verify the Jenkins Service
Start Jenkins as a system service:
1
sudo systemctl start jenkins
Check the service status to ensure it is running:
1
systemctl status jenkins
At this point, Jenkins is installed and running as a background service, ready for web-based setup.
Accessing Jenkins
With Jenkins running as a service, it can be accessed by navigating to the following URL in a web browser:
http://<public-ip>:8080
Replace <public-ip> with the public IP address of the EC2 instance.
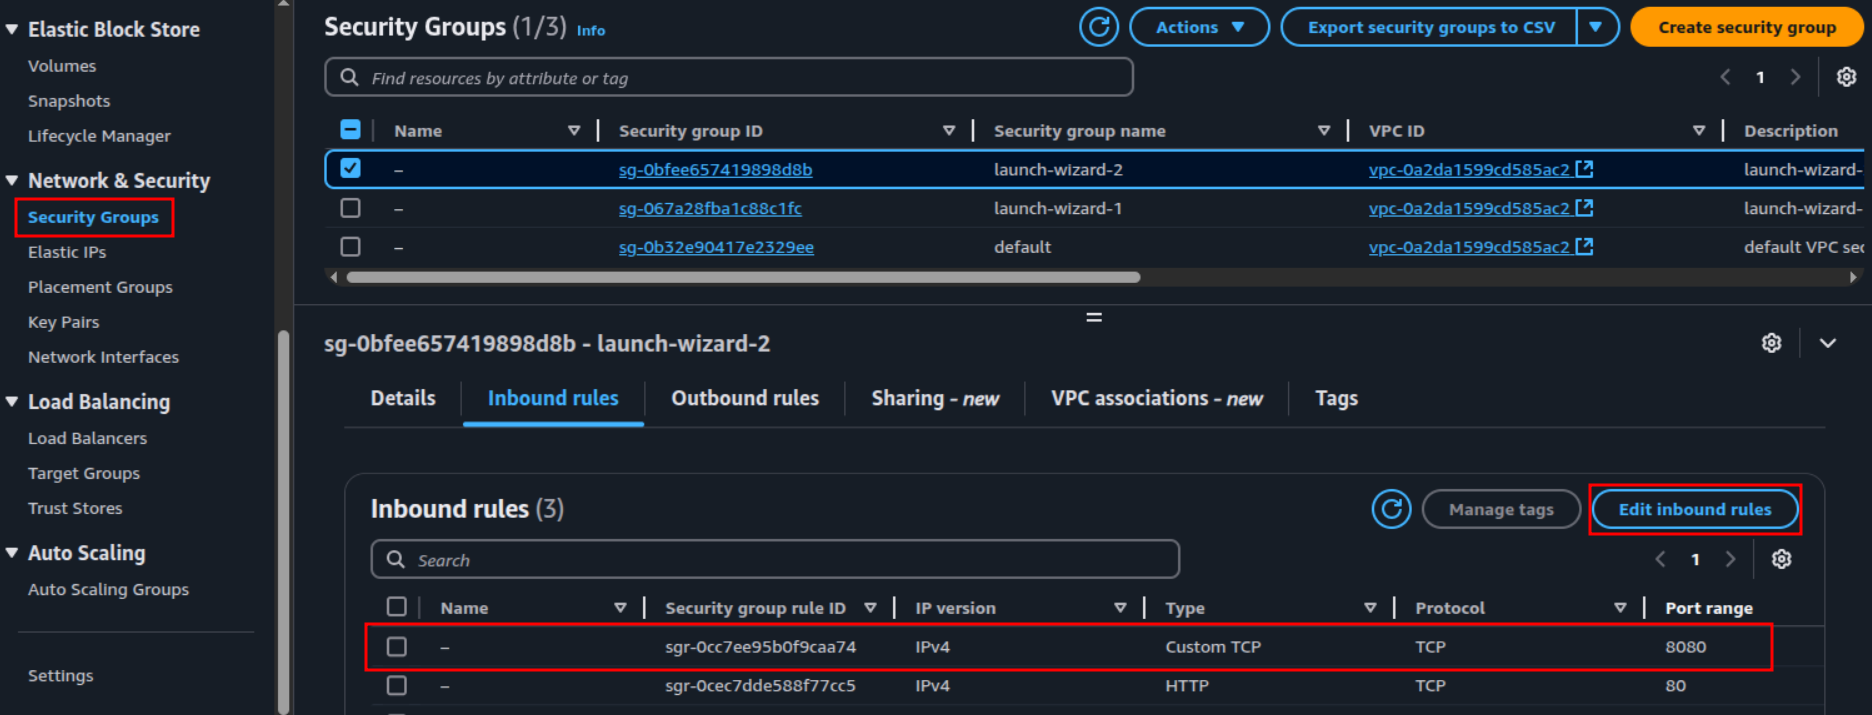
If Jenkins is not accessible at this address, it’s likely due to a firewall restriction. AWS uses Security Groups to control inbound and outbound traffic to instances. To allow access on port 8080, follow these steps:
- Open the AWS Management Console and navigate to the EC2 Dashboard.
- From the left-hand navigation pane, select Security Groups.
- Locate and select the security group attached to the EC2 instance.
- Go to the Inbound Rules tab and click Edit inbound rules.
- Add a new rule with the following configuration:
- Type: Custom TCP
- Port Range: 8080
- Source: Anywhere (0.0.0.0/0)
Save the rule. This change allows HTTP traffic on port 8080 to reach the Jenkins server. Refer to the image below for an example configuration of the inbound rule.
Note: By default, Jenkins runs on port 8080. If this port is already in use by another application or service, it can be changed by modifying the JENKINS_PORT environment variable in the /lib/systemd/system/jenkins.service file. After changing the port, ensure that the corresponding inbound rule is added to the AWS Security Group to allow traffic on the new port.
With the default configuration, Jenkins should now be running on port 8080 and accessible via the browser using the public IP of the instance.
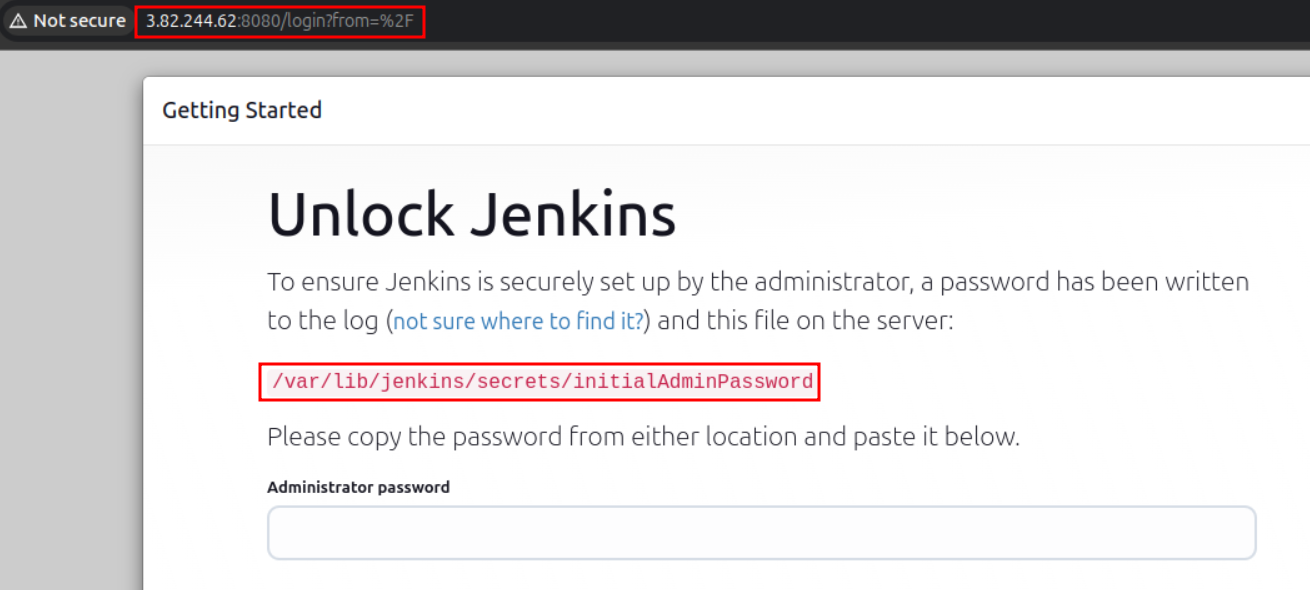
To begin the Jenkins setup in the browser, a one-time administrator password is required. Retrieve it by running the following command in the SSH session:
1
sudo cat /var/lib/jenkins/secrets/initialAdminPassword
Copy the displayed password and paste it into the browser when prompted on the Jenkins setup screen.
Proceed by selecting “Install suggested plugins”. This will initiate the installation of commonly used plugins and may take a few minutes to complete.
Once the plugins are installed, fill out the form to create the first admin user, then continue through the remaining setup steps.
After configuration is complete, click “Start using Jenkins”. The Jenkins dashboard is now ready for use.
Jenkins Components
Jenkins consists of several key components that work together to automate the build, test, and deployment process:
- Jenkins Master: The central server that manages job scheduling, configuration, plugin management, and the web UI.
- Jenkins Agents: Remote machines or containers that execute the build and test tasks delegated by the master.
- Jenkins Plugins: Extend Jenkins’ functionality by integrating with tools like Git, Docker, Maven, Slack, and more.
- Jenkins Job Configuration: Defines the steps for building, testing, and deploying applications, either through the UI or Jenkinsfile.
- Jenkins Pipelines: Code-based workflows that automate the entire CI/CD process with flexibility and version control.
Jenkins CLI
Jenkins also provides a built-in Command-Line Interface (CLI), allowing users and administrators to interact with Jenkins through scripts or a shell environment. It’s useful for automating routine tasks, performing bulk updates, and troubleshooting.
The CLI client can be downloaded directly from the Jenkins controller using the following URL:
1
http://<public-ip>:8080/jnlpJars/jenkins-cli.jar
Note: Replace <public-ip> with the actual public IP address of the Jenkins server.
Before using the CLI, generate an API Token from the user profile → Security section, which is required for authentication.
Once downloaded and authenticated, the following command lists all available CLI commands:
1
java -jar jenkins-cli.jar -s http://<public-ip>:8080/ -auth <your-username>$:<your-api-token>
In the next section, a basic Jenkins Pipeline will be created and configured to demonstrate how Jenkins automates software delivery.
Jenkins Pipeline
A Jenkins Pipeline is a powerful feature that lets users define and automate the complete software delivery process—from building to testing to deployment. Pipelines are implemented using a set of plugins that support “Pipeline as Code”, enabling better visibility, version control, and flexibility in CI/CD workflows.
A Pipeline is typically defined in a file called a Jenkinsfile, which is stored in the project’s source code repository. This allows teams to manage and track their build logic just like application code.
Here’s an example of a basic Jenkinsfile:
1
2
3
4
5
6
7
8
9
10
11
12
13
14
15
16
17
18
19
20
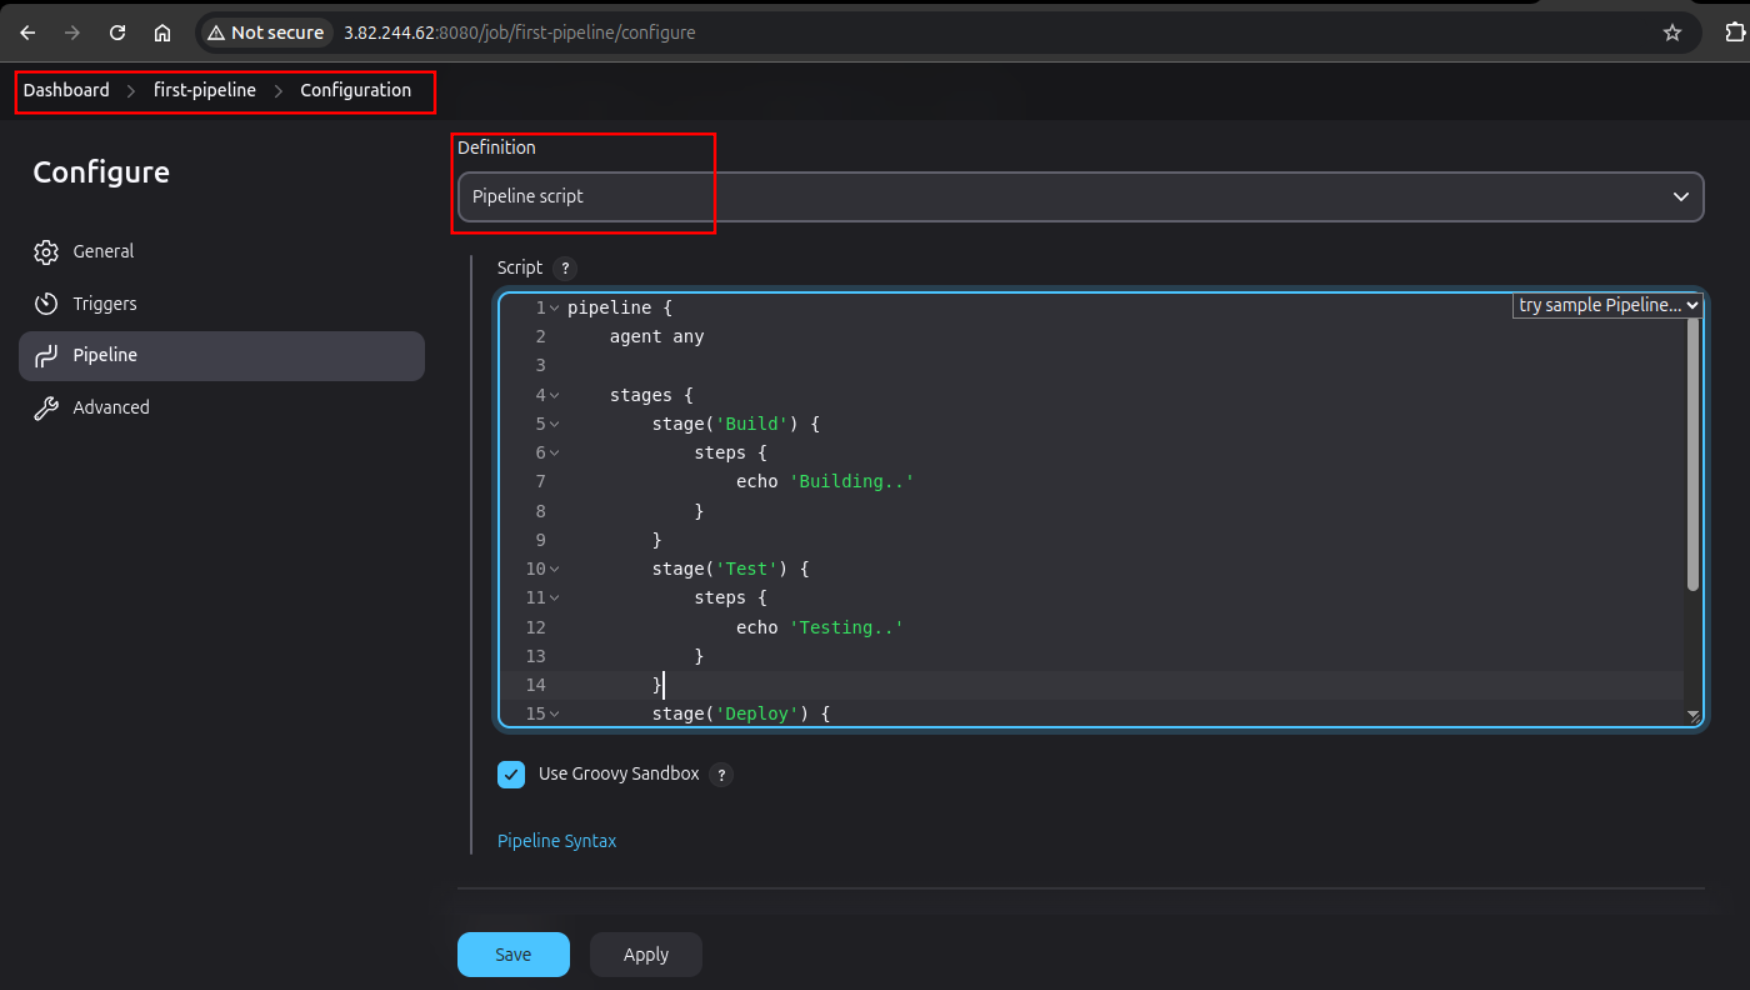
pipeline { // defines a block containing all instructions
agent any // Execute this pipeline on any available agent
stages {
stage('Build') { // Defines build stage
steps {
echo 'Building..'
}
}
stage('Test') { // Defines Test stage
steps {
echo 'Testing..'
}
}
stage('Deploy') { // Defines Deploy stage
steps {
echo 'Deploying....'
}
}
}
}
Creating a Pipeline in Jenkins
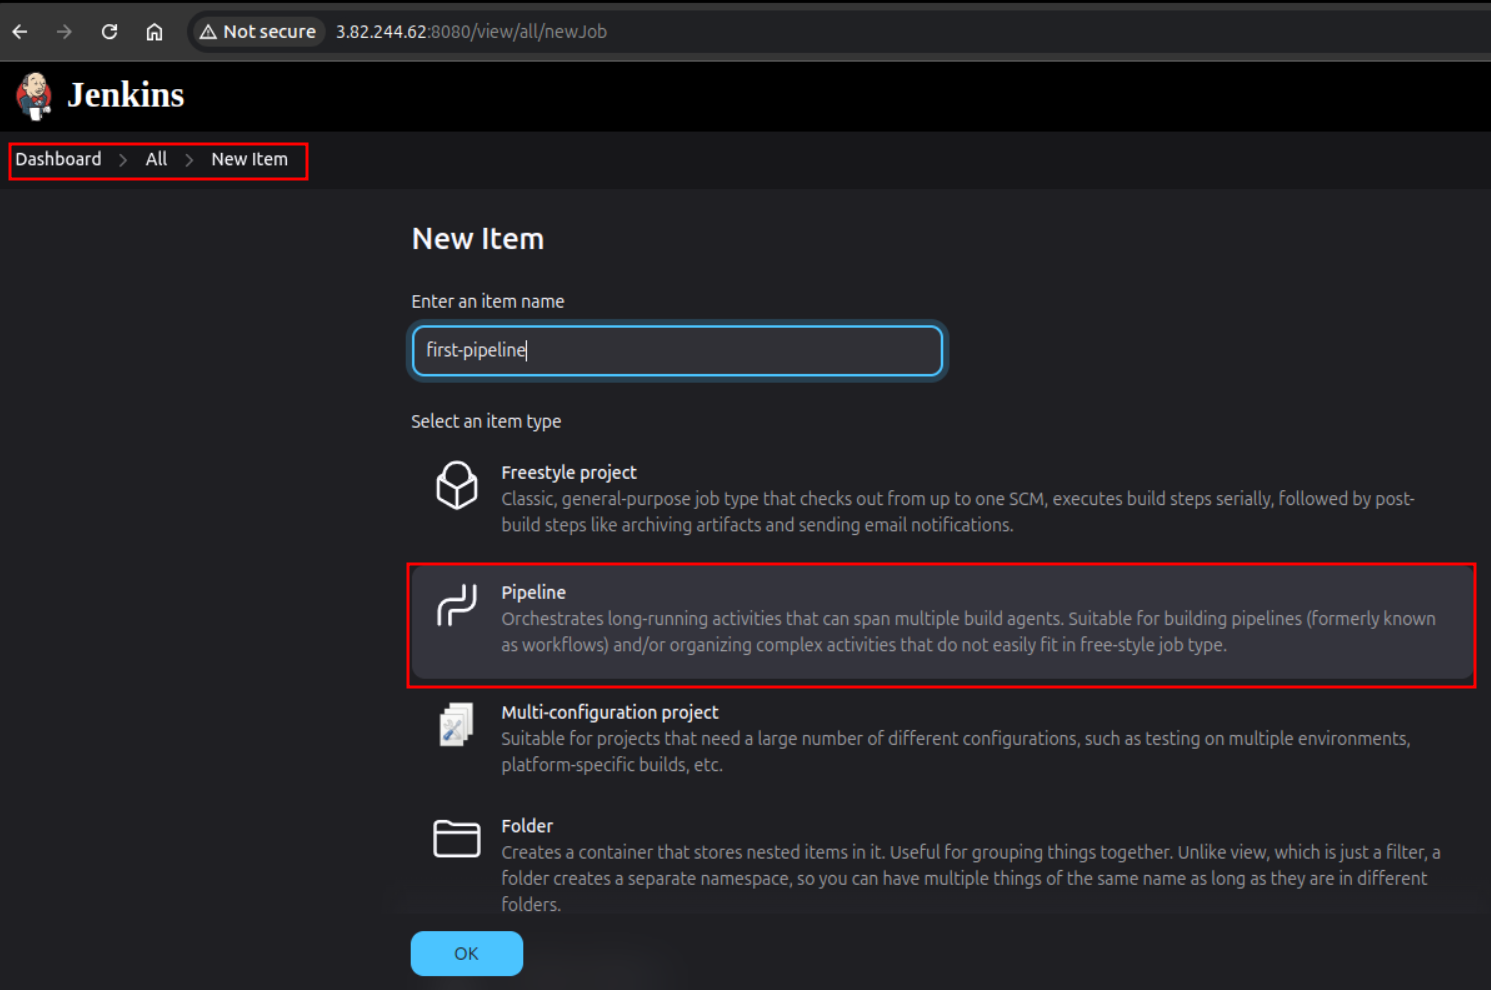
- From the Jenkins dashboard, click on “New Item”.
- Enter a name for your pipeline, select “Pipeline” as the item type, and click OK.
- In the pipeline configuration page, scroll down to the Pipeline section. Leave the default settings as-is for now.
- Paste the sample pipeline script into the Definition area.
- Click Save.
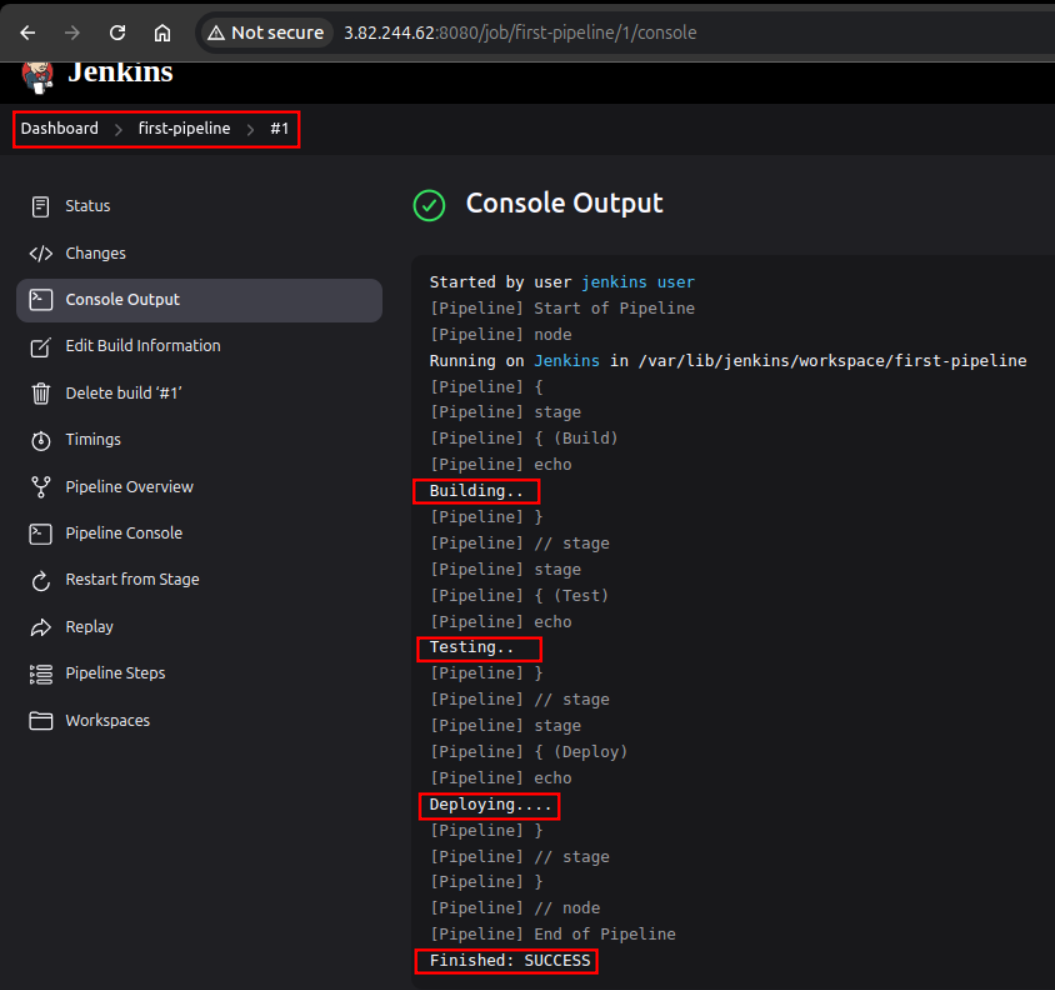
Once saved, trigger the pipeline by clicking on “Build Now” from the left-side menu. A new build will be queued and executed.
To see the output:
- Click on the build number from the build history list.
- Then click on “Console Output” to view logs for each stage of the pipeline.
Next, here’s a slightly more advanced Git-integrated Jenkins pipeline that pulls source code from a remote Git repository and automates the entire workflow: testing, building, and running the application. The sample web app used here is developed in Golang, so the Go plugin must be installed beforehand.
1
2
3
4
5
6
7
8
9
10
11
12
13
14
15
16
17
18
19
20
21
22
23
24
25
26
27
28
29
30
31
pipeline {
    agent any
    tools {
        go 'go-1.24.2'
    }
    environment {
        GO111MODULE = 'on'
    }
    stages {
        stage('Checkout') {
            steps {
                git 'https://github.com/AdminTurnedDevOps/go-webapp-sample.git'
            }
        }
        stage('Test') {
            steps {
                sh 'go test ./...'
            }
        }
        stage('Build') {
            steps {
                sh 'go build -o go-webapp-sample .'
            }
        }
        stage('Run') {
            steps {
                sh './go-webapp-sample &'
            }
        }
    }
}
To build this pipeline, Go version 1.24.2 needs to be added via Manage Jenkins → Global Tool Configuration → Go Installations, and named as go-1.24.2. Once added, save the configuration.
Once the pipeline builds successfully, the application should be accessible on port 8000. To allow access, make sure to add port 8000 to the EC2 instance’s inbound rules under the security group settings — just as was done previously for port 8080.
Conclusion
In this post, we walked through the essentials of Jenkins, from installation and setup to building real pipelines for automating the test, build, and deployment process. With a hands-on example using a Golang web application, you’ve seen how Jenkins fits into a typical CI/CD pipeline and how it can help streamline development workflows.
This wraps up my exploration of Jenkins. Up next, I’ll be diving into Docker and Kubernetes, two powerful tools that complement Jenkins in modern DevOps workflows. We’ll look at how containerization and orchestration bring scalability, consistency, and flexibility to application deployment. Stay tuned!
References
Jenkins Documentation:
- https://www.jenkins.io/
- https://www.jenkins.io/doc/book/installing/linux/
- https://www.jenkins.io/doc/tutorials/tutorial-for-installing-jenkins-on-AWS/
- https://www.jenkins.io/doc/book/installing/docker/
- https://www.jenkins.io/doc/book/managing/cli/#jenkins-cli
- https://www.jenkins.io/doc/book/managing/cli/#downloading-the-client
- https://www.jenkins.io/doc/pipeline/tour/hello-world/#creating-your-first-pipeline
- https://www.jenkins.io/doc/book/pipeline/jenkinsfile/
Kodekloud Course:
- https://www.coursera.org/specializations/devops-mastery
- https://www.coursera.org/learn/jenkins-for-beginners
Go Webapp Repo:
Others:
- https://ubuntu.com/tutorials/install-jre#2-installing-openjdk-jre
- https://labex.io/questions/what-are-the-main-components-of-jenkins-7771
- https://stackoverflow.com/questions/70681276/jenkins-pipeline-error-tool-type-maven-does-not-have-an-install
- https://stackoverflow.com/questions/78177034/jenkins-very-slow-upon-starting-ec2-instance-after-stopping